Vector Handphone

In this Adobe Illustrator tutorial, I’ll show you how to draw a vector mobile phone by using simple shapes and gradients. You will learn how to draw basic shapes to build a vector handphone from scratch. So let’s get started.
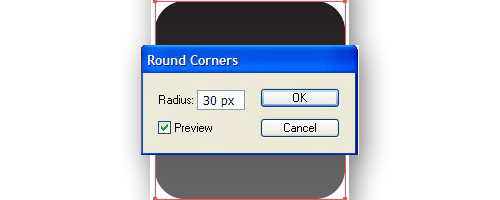
1. Select the Rectangle tool (M) and create a rectangle with sizes width 190px and height 460px. While the rectangle still selected, go to Effects> Stylize> Round Corners and in the opening window select Radius 30px and click Ok.


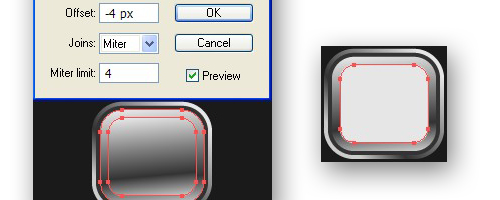
2. Fill the shape with Linear gradient colours from grey to dark grey. While the shape is still selected go to Object> Path> Offset Path and select Offset -2px and click Ok. You’ll notice that the shape is being duplicated in a smaller size. While the shape you just created is still selected open Gradient Panel and fill the shape with Linear gradient from white to light grey.


3. While the shape we just filled in with lighter colours is still selected go to Object> Path> Offset Path and select Offset -2px. Fill the created shape with Linear gradient as shown below.


4. Copy the last created shape using Ctrl+C and click Ctrl+F, decrease the size of the copy using the Selection tool (V) as shown below. Now, open Gradient Panel and fill with Linear gradient.


5. While the shape is selected go to Object> Path> Offset Path and select Offset -2px. Fill the shape with colour R=229 G=234 B=240 and then go to Object> Path> Offset Path and select Offset -2px and fill the created shape with Linear gradient which you used to fill the shape from step 3. To do so, select the Eyedropper tool (I) and click on the shape from step 3.


6. Now, with the shape still selected, go to Object> Path> Offset Path and select Offset -2px. Open Gradient Panel and click on Reverse Gradient to reverse the gradient.


7. Copy the last created shape with Ctrl+C followed by Ctrl+F. Fill the copy with this colour R=26 G=26 B=26 and decrease the size a little bit on the bottom and a little bit on the right and left side.

8. Select the Rectangle tool (M) and create a rectangle with sizes width 165px, height 119px, fill it with colour R=26 G=26 B=26. Posistion it like how it’s shown on the picture below and go to Object> Path> Offset Path and create Offset -2px. Fill the created shape with Linear gradient as shown below.


9. While the shape you just created and filled with Linear gradient is still selected, go to Object> Path> Offset Path and select Offset -4px and click Ok. Apply Stroke Colour to the created shape with colour R=77 G=77 B=77 and 1 pt.

10. Select the Rectangular Grid tool, click once over the document, a window will open. Fill in the following settings: Width: 164px, Height: 117px, Horizontal Dividers, Number: 3, Vertical Dividers, Number: 2, click Ok. Now you need to remove the four corner dots by using Direct Selection Tool (A) by clicking over the dot who needs to be removed and click Delete on the keyboard. After that apply Stroke colour black colour, 1pt and position the shape like how it’s shown in the picture below. Now select the shape from the previous step and the shape you just created, open Pathfinder Panel and click on Divide.


11. Select the Rectangle tool (M). Create a rectangle with sizes width 135px, height 176px, fill it with white colour and position as how it’s shown below.

12. Create a rectangle using the Rectangle tool (M) with sizes width 52px, height 5px, then go to Effect> Stylize>Round corners and in the opening window select radius: 5px. Fill the shape with Radial Gradient with colours from grey to dark grey and position it how it’s shown below.


13. Create a rectangle using the Rectangle tool (M) with sizes width 60px, height 55px. Now, let’s round the rectangle’s corners. To do so, go to Effect> Stylize> Round Corners and in the opening window select Raduis: 15px, then click Ok. Fill the shape with Linear Gradient. To do so, open Gradient Panel by clicking Ctrl+F9. You need to have 4 Stop Color Sliders alltogethe. For the first one, from left to right select this colour R:204 G204 B:204, for the second one R:51 G:51 B:51, for the third one R:128 G:128 B:128 and for the fourth one R:230 G:230 B:230.

14. While the rectangle that we just rounded the corners to is still selected, go to Object> Path> Offset Path, select Offset -2px and fill the shape with dark grey colour.

15. Now, while the shape is still selected go to Object> Path> Offset Path, select Offset -2px and fill with Linear Gradient like how it’s shown on the picture below.

16. While the shape we just created is still selected go to Object> Path> Offset Path and select Offset -4px and for Fill Colour select light grey colour.

17. While the last created shape is still selected, go to Object> Path> Offset Path and select Offset -2px, fill the shape with dark grey colour and again go to Object> Path> Offset Path and select Offset -5px. Now, while the last created shape is selected, go to Effect> Stylize> Round Corners and in the opening window select Radius 5px and click Ok and fill it with Linear Gradient.


18. Create a rectangle with sizes width 29px, height 15px and go to Effect> Stylize> Round Corners and in the opening window select Radius 4px and for Fill Colour select black colour. While the shape is still selected, go to Object> Path> Offset Path, select Offset -1px and fill with colour R: 242 G: 242 B: 242. Again go to Object> Path> Offset Path, select Offset -0.5px. Fill the shape with dark grey colour and move it a little bit down using the arrow keys on the keyboard.


19. Select the Line Segment tool and create a line with sizes Length: 8 px Angle: 0, select dark grey as a Stroke colour, 2pt. Position the shape over the button. Select the 4 shapes you have created earlier and group them by Object> Group. After that, duplicate them 3 times and position them like how it’s shown below.

20. And the last thing to do is to add numbers and letters over the buttons and you can also add a cool wallpaper on the display of the phone. Now, select all the shapes of the phone, group them by Object> Group by Ctrl+G and add some Drop Shadow Effect> Stylize and with that we are finished.


And here is the final result:


No comments:
Post a Comment